My So-Called Yoga Life

The best and most beautiful things in the world cannot be seen or even touched- they must be felt with the heart. ~ Helen Keller
My So-Called Yoga Life
  • Home
  • About
  • Contact
  • Tag: Yoga

    • What is a Mala?

      Posted at 10:14 pm by Lisa K, on July 23, 2017

      If you have been to a few yoga classes you have probably seen or at least heard of mala beads. Maybe you have seen them at a metaphysical store or at a booth at the yoga conference. What are those beautiful bead necklaces and what are their significance in the practice of yoga?

      In Sanskrit, the term mala means ‘garland.’  They are usually made up of 108 beads and one larger central bead called a guru bead.  These are the type of prayer beads used by Buddhists and Hindus. When they are used, a mantra or intention word is repeated with each bead, starting at the guru bead and ending again at this central bead. If the user wishes to do more, the guru bead is never crossed over, rather the beads are flipped and counted away from the guru bead again. Mala beads date back to Hindu religious practices around the 8th century B.C.E.

      In Hinduism there are two main branches called Shaivism and Vishnuism. The former uses 32 to 108 rudraksha beads made of seeds from a unique Javan tree. The seeds are rough and separated into 5 sections to represent the 5 faces and personalities of Siva and also represent the rigid lifestyle required by worshippers. Vishnu mala are carved of tulsi wood and have 108 beads.

      Buddhist mala have 108 beads which represent the impurities that must be overcome to reach Nirvana. The beads were once only made of the sacred Bodhi tree but now are crafted from many other materials as well.  Healing Mala may be made of gemstones or crystals which have different energies, colours and properties that may aid in different healing practices.

      The crystal mala used in healing may use stones specific to correct an imbalance. For example, I went for an colour aura scan and had a slight imbalance in my solar plexus or third chakra.  A crystal used for healing this imbalance is citrine. I got a citrine mala bracelet to help me create balance here. It is very interesting to learn about crystals and how their properties may be used to help work with the subtle aspects of our energetic being. It is something that I am new to and wish to learn more about.

      A place to find some gorgeous mala beads is https://purplelotus.ca/

      Anyone may use mala beads and the meaning they will bring to each will be individual in their prayer and meditation practice. According to Hinduism, they are used by the right hand and the thumb is used to move from one bead to the next. The index finger should not touch the beads through the transfer and the beads are draped over the middle finger.

      To begin a meditation practice using a mantra or an affirmation is a great way to stay focused and really with your practice. Using a mala to help you count your repetitions will allow you to completely focus on your intention.  It is easy for the mind to wander sometimes, which is okay, but the mala is another helpful way to increase concentration.

      Here is a simple practice for you to use a mala:

      First decide on your mantra, affirmation or intention word. This will be what you repeat with each bead and the focus of your meditation.
      Sit as comfortably and as tall as you can. Take a few deep breaths by inhaling through the nose while letting your chest and belly open. Exhale through your nose equally and fully. Try closing your eyes and taking 5 deep breaths this way.

      Hold your mala in your right hand with the mala draped over your middle finger and in your palm. Bring your thumb to the bead just past the guru bead. Begin your mantra and use your thumb to move to the next bead with each repetition. Keep your eyes closed to enhance your focus. When you come around the mala and back to the guru bead you may finish or flip the mala to go back around again. When you have completed your meditation, sit and take a few more deep breaths before opening your eyes. Hopefully you will have a positive experience that will stay with you for the rest of your day:)

      Share the Love

      • More
      • Share on Tumblr
      • Pocket
      • Click to share on Telegram (Opens in new window) Telegram
      • Click to share on WhatsApp (Opens in new window) WhatsApp
      Like Loading...
      Posted in Meditations, Uncategorized | 26 Comments | Tagged happy, Mala, meditation, positive, Yoga
    • Yoga For Tight Shoulders

      Posted at 3:07 am by Lisa K, on July 10, 2017

      This practice is done mostly while sitting with your legs crossed or on your heels if crossing your legs isn’t comfy.  No mat needed!

      I want to tell you a little story about my shoulders that you just might be able to relate to…

      When I was working as an educator years ago, my hours were around 16 hours a day. I traveled for 3 hours daily and was living life with a high stress factor. Luckily, I really loved what I was doing but I was paying the price for long hours by having very little personal time.  Though I was always active, there was just no time! So I thought I’d try something else that could be healthy- At the time detox cleanses were all the rage. I thought I would try one out since I could augment my diet and clean it up without interfering with my job. It Actually turned out to be really tough. I had to cut coffee, which left me with a three day headache, eww! After the haze lifted, I started to feel okay again. I was quite a different person though, LoL! So much more quiet and less bubbly were the first things I noticed about myself. Not bad things, just very different. I started to pay more attention to myself in other ways as well.

      I was walking around with my shoulders up ALL THE TIME.

      I sat at my computer and worked with them tensed up like this. I walked around the school this way, I took transit home, still tiring myself out by subconsciously holding my shoulders up. I had frequent headaches and felt tension in my shoulders, but thought it was from carrying my laptop bag around and general stress. Wow, once I noticed how this little habit had crept into my daily living, I was kind of shocked at how much I was doing it and above all, how completely OBLIVIOUS I was! I started reminding myself to relax my shoulders every time I noticed I was doing it.

      I think I reminded myself around 35 times a day the first week.

      Just imagine the times I didn’t notice! Anyways, I felt much better after doing this for just 2 weeks. After about 1 month, I had trained myself to function without the raised shoulders. The amount of stress and tension I had released with this simple change in my daily posture changed much about how my body felt in general. It’s amazing how expending energy and creating needless stress can affect the body, especially when you notice the change once it’s removed!

      Why am I telling you about this craziness?

      Well, for many of us, a computer or a desk is a daily reality. I thought it might be a good idea to share a little yoga sequence geared towards relaxing the shoulders and giving yourself a free therapeutic yoga session! I can’t be the only one who has created significant tension in this area of my body;)

      So when you finish up work for the day and want to gear down in a healthy and positive way, give this targeted and easy sequence a go!

      Put on some comfy clothes, NO MAT NECESSARY! Just a couple of fluffy pillows or if you have them- 2 yoga blocks.

      Yoga For Shoulder Tension

      Start in a seated position with your legs crossed. Sitting as tall as you can, take a few deep breaths to begin relaxing yourself. Close your eyes if this helps you to chill out. Then when you are ready, start with some shoulder rolls, go back into a circular motion slowly 5 times and then slowly forward 5 times.

      IMG_2126

      Head Rolls

      Roll out your neck by letting your chin fall toward your chest and then inhale as you circle to the right, exhaling as you come around again. You can let your head go back if it is comfortable or simply bring your head through a half circle, letting your neck remain up straight as you bring your head up from your starting side.  Do 5 slowly to the right with deep inhales and exhales and then repeat this process going to the left.

      IMG_2125

      Interlace Finger Stretch

      Now take your hands in front of you, interlace your fingers and turn your palms out. Send your arms up towards the sky. Hold here and take 5 deep breaths. Then open them and let them come down to the floor. Now take your arms behind you, interlace your fingers and tip your body forward, letting your arms come up. Hold for 5 breaths and then come back to sitting and let your hands come to your sides on the floor.
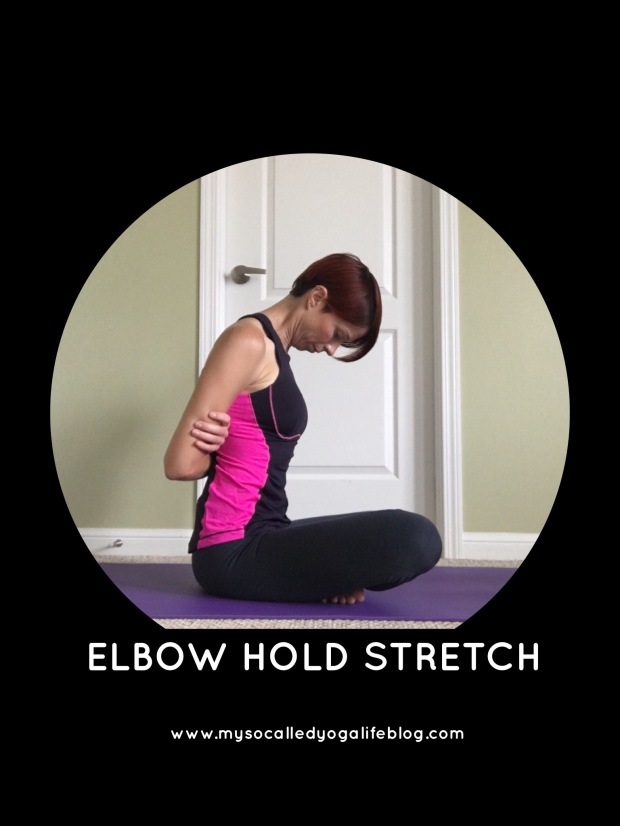
      IMG_2127

      Elbow Hold Stretch

      Bring your hands to opposite elbows behind you, bring your chin down towards your chest and hold for 10 breaths.  This stretch is a bit more passive and it feels very good with the internal rotation of the arms while letting everything relax into the stretch here.

      IMG_2136

      Side Body Stretch

      Take your right arm and lift it up, stretch up and over to the left, letting your left hand walk away from you as you lengthen to the side. Try to keep both seat bones on the ground.  Lift the chest, hold your low belly back.  Hold for 5 breaths, then come back to the middle and do the left arm up, stretching to the right.  After your 5 deep breaths, let your arms come down to rest on your knees.

      IMG_2128

      Easy Twist

      Bring your right hand behind your back, palm on the floor as close to your spine as possible.  Bring your left hand to your right knee.  Now take a deep breath in- as you exhale, twist and turn your head to look over your right shoulder.  Take 5 slow deep breaths here and then return to centre.  Repeat for other side, taking the left palm behind your back as close to your spine as possible.  Right hand to left knee this time.  After your deep inhale, twist as your exhale and look over your left shoulder.  After your 5 breaths, come back to centre.

      IMG_2130

      Eagle Arm Stretch

      Now take your hands in front of you, cross the right over the left and turn your palms towards you.  Now cross your wrists with the right one away from you and see if you can bring your palms towards each other.  They don’t have to be lined up.  Deep breath in and raise the elbows up until you feel the stretch and hold for 5 deep breaths. Then bring them down, letting your back curl up and your elbows come down towards your abdomen. Breath deep for 5 breaths here and then come up and shake your arms out!  Now try the other side with the left arm crossing over the right, palms turn towards you.  Cross your wrists with the left one behind and try to bring your palms towards each other.  Repeat lifting elbows up, then elbows down with a curled back and then come up and give your arms another shake!

      IMG_2133

      Cow Face Arms

      For this pose, you can take a pillow case or other bit of fabric to hold if your hands don’t reach each other in the pose.  This one is a real stretch, so give it a try with your prop first and then give the full on posture a go!  So grab your pillow case near the end with your right hand and raise your arm straight up next to your ear.  Now bend at the elbow only and bring your hand towards the base of your neck on your back.  Take your left arm now and have it down, internally rotated so you can reach for the pillow case which is hanging down your back.  Use your hand to walk up the case, bending at the elbow as far as you feel is comfortable.  Sit tall, keep your head up straight and breath deep for 5 breaths.  Now let go of the prop and shake out your arms.  Let’s do the other side! Take your pillow case near the end in your left hand, raising it up beside your ear.  Bend at the elbow and bring your hand towards the base of your neck on your back.  Take your right arm now, rotate the arm in so as you reach behind you for the pillow case, it is positioned correctly.  Walk your hand up the pillow case a small far as is comfortable and do your 5 breaths.  Shake those arms out!

      If you want to give it a try, do it without the prop.  When you walk your left hand up on the first side, you can press it into your back to move up and grab the fingers on your right hand.  Same fo the left side.  It is an intense stretch so be careful when attempting this version:)
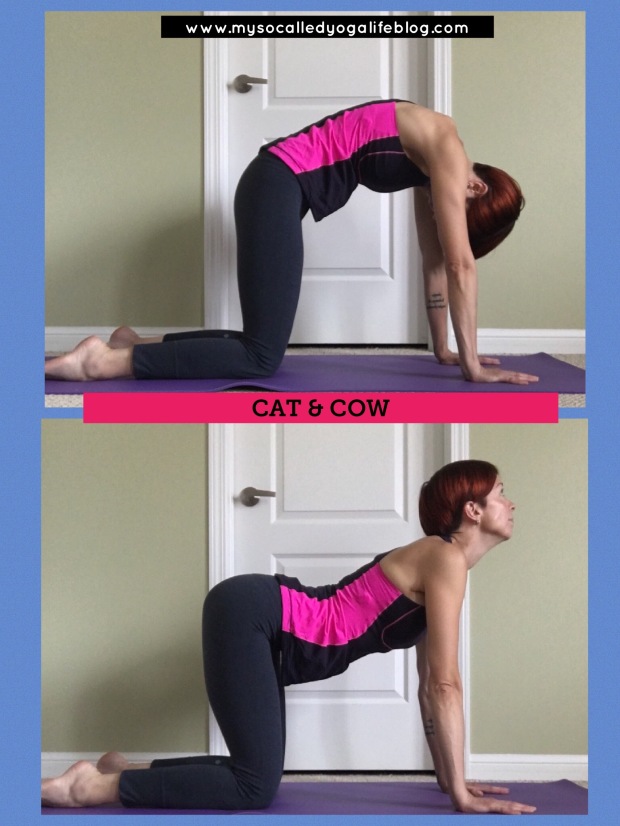
      IMG_2132

      Cat & Cow Pose

      Come to table pose. Hips over knees and shoulders over hands.  Now inhale, as you exhale, round your back (into cat) and press your hands firmly into the ground.  As you inhale, let your tummy collapse down (into cow) and bring your head up.  Do this dynamic stretch 5 times while exhaling into cat and inhaling into cow.

      IMG_2131

      Puppy Pose

      Come down onto your elbows and bring palms down. Let your chest come towards the floor as you extend your arms away from you into puppy pose.  You will feel this stretch in your shoulders and under your armpits.  Hold for 10 breaths, passively breathe into this pose, walking your fingers away as far as is comfortable.  Let your head comfortably lay on the mat.
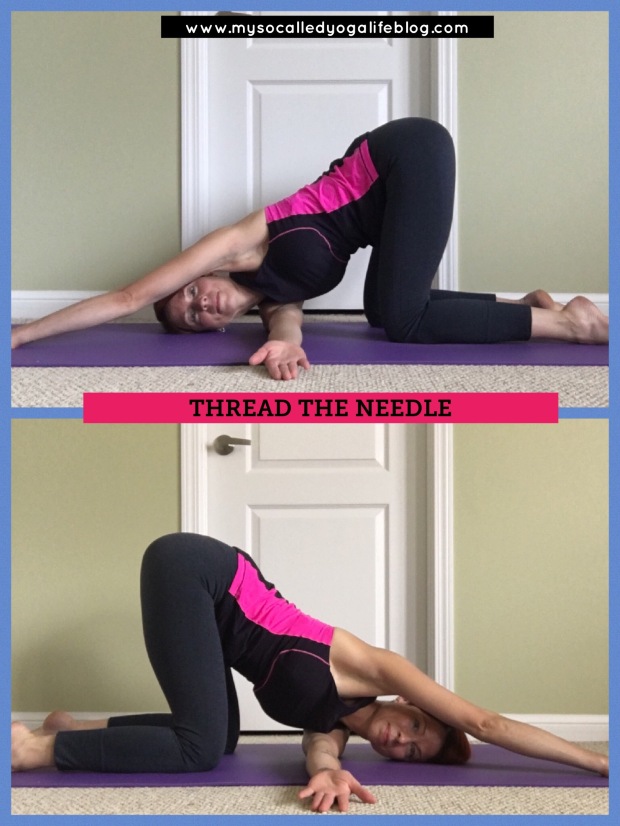
      IMG_2145

      Thread The Needle

      Come up to table pose again and this time bring your right arm behind your left hand and begin to lower your shoulder down to the mat.  Let your left arm extend forward and feel a nice stretch on your right shoulder.  Hold for 5 deep breaths and then come back up to table and let your left arm come behind your right hand, bringing that shoulder down onto the ground.  Same length in the right arm and hold for 5 breaths before coming back up.

      IMG_2129

      Shoulder Release with Prop

      You should be back into table top pose once your prop is in place.  If you have 2 blocks, set them up shoulder width apart on the long side down (on the lowest level) and place your elbows on them. Bring your palms together.  Let your head come down towards the floor. If you don’t have blocks, get a fluffy pillow or 2 and put your elbows on that. It will be a softer stretch, but maybe that’s just what you need! After 5 deep breaths, slowly come out of the pose and put your prop off to the side.  If you were using a pillow, bonus! You can put it under your head for the next pose:)

      IMG_2135

      Savasana

      Slowly lay down on your back with your palms up and feet resting outwards in savasana. Relax for 5 minutes or more as you wish.

      IMG_2134

      How do those shoulders feel now? I bet they feel loose and the tension you had is long gone! So easy! So quick!  And the way your body will feel if you do just this shoulder sequence a couple of times a week will make a big difference! Hope you had fun with me!

      NAMASTE😊

      Share the Love

      • More
      • Share on Tumblr
      • Pocket
      • Click to share on Telegram (Opens in new window) Telegram
      • Click to share on WhatsApp (Opens in new window) WhatsApp
      Like Loading...
      Posted in Uncategorized, Yoga Sequences | 41 Comments | Tagged ashtanga, beginneryoga, de-stress, easyyoga, inspiration, life, loveyourself, practice, release, selfcare, shoulders, tension, Yoga
    • Yoga For Kids

      Posted at 6:29 pm by Lisa K, on June 25, 2017

      So I am currently doing an instagram yoga challenge with my kids! It is so much fun to do the different poses with them. I started thinking, I should write about how to do yoga with your kids! Simple, easy ways to bring yoga into your lives that can be as good for you as it is for them:)

      Think about this…

      As adults, people come to yoga for many reasons. A big one is to get healthy. What does being healthy mean? For some it might be losing weight. It might be finding a way to do exercise with a body that has limitations or health conditions that make many other activities uncomfortable. Once we start doing yoga and noticing the physical benefits, suddenly we begin to notice some unexpected bonuses. The deep breathing and calmness that comes from connecting to our bodies illuminates a new way to find stress relief and some head space.  As we do yoga more and more, it shows us that by simply connecting with the body, we can become more aware of the state of our physical, emotional, mental and even spiritual well-being.

      The physiological benefits of deep breathing alone have been proven scientifically. Yoga brings focus, stress relief, physical activity and helps us to connect with our bodies. What an amazing supply of tools we can share with our children!

      There are some easy ways to start teaching children how to do yoga. Loose fitting or active wear clothing are best. You don’t even need a mat, the floor is just fine to do these fun postures. Bare feet is best to help feel into them and so it’s not too slippery;) There are 3 breathing exercises and 8 poses included here. As your child builds focus and concentration, you can begin with a few and work up to doing all of them. Do what works for your kids and go from there. Let’s start with some breathing!

      Toy Ride Breath Exercise

      Have your child bring their favourite stuffed toy and lay down on his back with the toy on his tummy. Tell him to take deep breaths slowly in through the nose and out through the nose. Kids naturally use their bellies to breath and they can watch their stuffed toy go for a ride on their tummy, up and down. If you get him to take 10 deep breaths, your job is done. If you do this with your child regularly, he will think of it as a fun activity and his nervous system will be soothed at the same time.

      Bee Breath

      Another fun way to get kids to breath is to practice the bee breath. Get her to sit with her legs crossed, nice and tall and take a deep breath in and then hum like a bee until the breath is all exhaled. This calming breath can help release strong emotions like anger, feelings of anxiety and stress. Try for 5 rounds, but I bet she’ll do more. The vibration of the humming on the head feels good and is a great way to stimulate focus and concentration.

      Lion’s Breath

      The lion’s breath is done by taking a deep breath in through the nose and then as you exhale, you let your tongue stick out and say “hhhaaaa!”. It feels silly and looks silly so it’s a winner! This breath is just another way to have kids focus on breathing deeply while having fun. My kids laugh every time! Do as many times as you wish!

      IMG_2073

      Yoga Poses

      Kids enjoy doing yoga poses, my 4 year old daughter takes her mat out all by herself to show me her downward dog, triangle and warrior 2 on the regular! Downward dog comes easily and kids like it. I get her to take 5 deep breaths in any pose she does. Triangle is a good one. The boat pose is fun because kids are literally trying to look like a boat when they do it, LoL. So I have a little list of poses and pictures to demonstrate them.  Encourage your child to breathe deeply for 5 breaths in each pose.  It isn’t important to try and find the exact expression of the poses, rather finding the general shape is good for kids, especially when they are just starting out.  I have included some general points on form for reference.  Do them with your kids and before long they will start wanting to do them on their own!

      The Downward Dog

      This pose is basically an inverted V. This pose strengthens the hands, arms, shoulders, calf muscles, back and core. The upper body is upside down and so it is calming to the nervous system too. Palms flat, press into entire hand. Relax the neck.

      IMG_2062

      The Triangle Pose

      This pose provides stretch and strength to the body. Another great benefit is that it activates the abdominal organs. Try for feet to be wider than hip width, front foot turned to the short end of the mat and back foot with toes facing the long side of the mat.  Tip over at the hips like a tea kettle, with the lower arm resting along the front leg or extended down and the top arm up to the sky.  Who doesn’t think it’s fun to be a triangle?

      IMG_2069

      The Cobra Pose

      This pose is wonderful for opening the heart and lungs. It strengthens the arms and shoulders. It gives a stretch to the abdominals, chest and shoulders too.  Laying on the tummy, bring the hands next to the ribcage.  Press the tops of the feet into the floor, press into the hands and slowly raise the chest up. Go up as much as is comfortable.  Breath and enjoy!

      IMG_2067

      The Warrior 2 Pose

      It gives strength to the legs and arms. It gives confidence and focus to the mind. Kids feel powerful and strong!  Feet apart further with the front foot facing the short side of the mat and the back foot facing the long side.  When bending the front leg, the knee should be above the angle for stability.  Arms are parallel to he floor, extend through the fingers.  Feel the strength and power of this awesome pose!

      IMG_2066

      The Butterfly Pose

      This one helps to open the hips and thighs. It also reduces fatigue and releases tension.  It is super fun to do too. My little yogi likes to gently bounce her knees like little butterfly wings when she sits in this one too. Sit tall, bend the knees to bring the soles of the feet together.  If the knees are up higher, it’s okay:)

      IMG_2068

      The Tree Pose

      Great for balance and grounding! Start with the toes of the bent leg on the floor to gain balance and as concentration and focus grow, move the foot up the leg. Make sure to let the knee be free and rest the foot above or below as you get more balanced with this one.  Having the arms out helps with developing balance, hands could be in prayer or reaching up like branches of a tree.  Try closing your eyes once you get super grounded in this pose.  Just a fun thing to try! Or keep your eyes open and find a to gaze at, helps you balance.

      IMG_2064

      Bridge Pose

      So fun to lift the hips and again open the heart!  Keep feet hip distance and flat on the floor. Grabbing the ankles helps to be sure the feet are the right distance from your body. Gives tons of strength to the legs, helps grounding. It helps with stress and improves blood circulation.  Try to keep the legs hip width apart as you lift your hips.

      IMG_2063

      Happy Baby Pose

      This one releases the low back, excellent to do after bridge pose. It stretches and soothes the spine while calming the nervous system. The legs are bent, knees point towards the floor, feet flexed and you can grab the inside or outside of the feet. You can try rolling side to side in this one for a little massage on your lower back too!

      IMG_2065

      When you are all done, try laying down softly on the floor legs and arms softly next to you.  This is relaxation.  Close your eyes and imagine birds flying over your head and a rainbow shining over the sky above you.  See how long your child will stay here, maybe 15 seconds or 5 minutes!

      These breathing techniques and poses are a fantastic way to introduce yoga to your kids. There is a variety of poses meant to help kids focus, have fun, get strong, feel good about themselves and explore their bodies in a healthy way. Hope you have as much fun doing these at home as we do! It’s  a fabulous way to have fun together!!!

      Share the Love

      • More
      • Share on Tumblr
      • Pocket
      • Click to share on Telegram (Opens in new window) Telegram
      • Click to share on WhatsApp (Opens in new window) WhatsApp
      Like Loading...
      Posted in Mini Yogis, Uncategorized | 41 Comments | Tagged breathing, exercise, funwithyoga, kids, kidsyoga, miniyogis, poses, Yoga
    • Yoga After Baby

      Posted at 2:48 am by Lisa K, on June 12, 2017

      After giving birth to two beautiful babies, getting back into my yoga practice presented with different challenges each time. My first baby was a dream, she slept for a long stretch from a young age and birth was pretty rapid and straight forward. I still felt more tired than I ever had and my energy stores were low for much longer than the usual 6 week recovery time. I did start a practice at home, a very short and often interrupted one at around the 12 week mark.

      Important differences I felt in my body were a general weakness in my abdominal muscles, pelvic area and hamstrings. I noticed while I was carrying my little girl around, that my lower back would often get sore. I knew I was dumping into my back as a result of my soft, weakened core (hey, that rhymed).  I began to really focus on trying to activate my core during regular activities, which was more tiring than I could recall it ever being, LoL.

      When I first began to practice, trying to locate the place in my pelvic floor muscles to lift was basically non-existent. I needed to be very careful with my hamstrings as well because when there is weakness in the core, the hamstrings can be overworked and over stretched as a result. There are so many poses that require forward folding in the primary series.   These are helpful for building back strength, but practice must be with focus and care.  I just didn’t fold very far. I concentrated on bringing the chest forward and low belly back.

      I really took my time and only did what I felt able to do because it wasn’t like I could just take a nap whenever I felt like it.  Healing from birth and making breast milk requires a lot of energy. Lack of sleep and a major change in my sleeping pattern made me tire easily at first.  According to yoga, there are some additional explanations for the loss of energetic stores in the body after birth.

      In yoga there are five vayus or “winds” that govern the movement and function of prana or energy flow in diffrerent areas of the body. The apana vayu is located in the root chakra or pelvic floor and is responsible for the outward movement of energy from the body. When a woman gives birth, the apana vayu is very active. There is a large concentration on the energy moving out of the body as the birthing process occurs. Afterwards, it is important to care for the body and attune this vayu. The pelvic floor is weakened and I most definitely had an awareness of this process in my body. There are Aryurvedic diets that can be followed as well to aid in the process of recovery but I didn’t know too much about that at the time. Poses which are good to rebalance are part of the Ashtanga primary series, lucky for me:) These are standing poses and forward folds which help ground and calibrate energy in the root chakra.

      Key Practice Points

      In forward folds, I bent me knees. Trying to activate my pelvic muscles and inner thigh muscles became an obsession. I mean, this area is the basis for all yoga poses and so working hard to build strength here was a necessary tribulation. I sweat into every pose, each like it was a new one. So many new sensations and feelings in many poses that I once felt were so familiar.

      I really breathed into each posture and became very comfortable with how far I was from my pre-baby practice level. Suddenly some aspects of what I focused on in my practice, such as pose depth, became like a joke to me. I felt like I had it all wrong!

      I knew that having a baby was going to teach me many things, but the most poignant lesson for my yoga practice was about perspective.

      I began to understand yoga as a lifelong journey with many fluctuations and cyclical movements forward and back. Not just a linear upward arrow! Just as practice has minor variances from day to day according to energy levels and mindset, on a larger scale, practice will have adjustments as my life and body change. I don’t feel like I was fully tuned into that prior to having my first baby.

      Practice became more sacred. I felt like each time I could get on my mat was a gift. I became much less concerned with anything but getting on that mat and breathing my way through. I was truly humbled by the complexities of life and how they evolved much of how I understood the world and the transformations I saw through the lens of yoga.

      The conclusion being:

      There is no conclusion in sight, just a vast number of layers appearing for me that I didn’t notice before. So interesting and inspiring!

      IMG_2038

      After my second baby, I expected many of the body changes that came after my first. I had natural birth and healed well. I still didn’t practice until about 5 months had passed. My son was the kind of baby who would wake up and want to party for a couple of hours in the night. We co-slept until he was 10 months old. He basically slept on the boob, LoL. I had a much different experience and having a toddler and a baby put asana on the back burner for a longer time. My body yearned for it though and I got away for classes a couple times a week at first. I did some strength training as well because my pelvic floor was noticeably less toned than after my daughter. I really worked on that part the most until I could reach those muscles again. I didn’t want to risk injury by underestimating the weakness present in this area of my body.

      At ten months, my son was napping consistently and I could get a good practice time in. Either early mornings, nap time or evening after the babes were in bed. I learned how to be super flexible in my routine. Once a rigid, unstoppable train, I became a fly-by-the-seat-of-my-pants kinda gal, LoL. Yes, more life lessons that having children have brought to me. I know there are many more waiting for me as they grow, but I can wait;). Now my practice is back and has moved forward with regards to the number of asanas that are in my Ashtanga series. I found that by working basically from scratch, two times over, my “spidey-sense” for what is happening in my body has been heightened significantly.

      I am very grateful for the many humbling, stressful, happy, crazy, tiring, joyful, difficult, messy, etc!!!! experiences that I have had with my little ones.

      My advice for any Yogi moms-to-be….

      After having a baby, enjoy the time and let practice find it’s way back to you. Relax into your squishy body, enjoy your new life with all the smiles, tears, joy, intense LOVE and everything in between! There is so much time to find your way back and so many things that will happen in life before that time may come.  Yogis work hard to become strong and flexible in body, in mind it is life which teaches us this gift.

      Share the Love

      • More
      • Share on Tumblr
      • Pocket
      • Click to share on Telegram (Opens in new window) Telegram
      • Click to share on WhatsApp (Opens in new window) WhatsApp
      Like Loading...
      Posted in Uncategorized | 36 Comments | Tagged apana vayu, ashtanga, baby, energy, Post-partum yoga, prana, seventh series, Yoga, yoga mom
    • Golden Ball of Light Meditation

      Posted at 10:57 am by Lisa K, on June 7, 2017

      This meditation is one that I learned years ago and practice often. It takes about 10 minutes, but the calming softness it leaves within me lasts much, much longer. If meditation is new to you, I promise that this one has just enough to focus on to help keep your mind from wandering. It is a good one to practice anytime, but I find it particularly helpful when I feel stressed or anxious.

      To start this meditation, find a comfortable place where your body doesn’t need to hold itself up. I like to prop pillows behind me while in bed. Relaxing on the couch is a good spot too. Make sure there are no noises you can control in the background, like the tv or music. Your arms and legs should not be crossed. Let your arms relax beside your body and your legs apart and relaxed at the knees. Closing your eyes will help with the visualization in this meditation as well. If it isn’t possible to meet all these recommendations, make yourself as comfortable as possible wherever you are. Years ago I did this meditation on the go-train so it can really be done anyplace.

      I have included a voice recording of this meditation below as well.  Have a listen:)

      Begin by taking a few deep breaths in through the nose and out through the nose. Try to relax the tummy and let it move freely with the breath. Then begin to envision a faint golden yellow ball up in the sky. As you breath, watch it slowly move down towards you and then settling under your feet. It is about the size of a basketball.

      Feel a gentle warmth coming from the orb of light on the bottoms of your feet. It is soft and comforting to you. The golden light is the hue of a beautiful morning sunrise in the middle of summertime. Feel the warmth begin to move into your whole feet up to your ankles. The golden ball has expanded and enveloped your feet. As you breath, feel into your feet. Let all the muscles, tendons, vessels and bones relax. If you feel anyplace that has tension or discomfort, invite the light into that place in your feet and feel it pass.

      Now feel the light permeate its way up inside your legs. The golden ball is embracing your legs to the level of your knees. Again, feel the light moving through the tissues in this part of your body. Let it soften you, release any tension. The light spirals over your upper legs to your hips. Your entire pelvis is now also bathing in the beautiful comforting warmth of the golden orb. Breathe into your pelvis, breathe into your legs. Let the light find its way into all the tissues and bones and structures of this deep root of your body. Find any areas that need the comfort of the warm light and breathe. Breathe in warm softness. Exhale tension and stress.

      The ball of light is expanding now to engulf your entire torso. Your abdomen, chest, back and organs. Your lungs feel the warmth. Your heart beats and brings with it healing light to your body. Take time to let go of stress, feel the shoulders release, the rhythm of your breathing is comforting. Now the light is spiraling out and around your arms down into your hands and out your fingertips. It is sparkling as it relaxes them. You feel warmth in your throat and softness permeating into your face and around your head. The golden ball is surrounding your entire being and you feel so content and calm. Breathe in warm softness. Exhale tension and stress. Sit and breathe as long as you wish or if you are doing this in bed, allow yourself to drift off to sleep.

      This visualization helps to reconnect with and relax the body and steady the mind. I enjoy it every time I do it. If your mind gets distracted at any time, just call it back and continue on. Some days I am more focused than others and that’s okay. Go with the flow of your breath and each time you use this calming meditation, you will feel soft and calmness come over your being. Enjoy!

      Voice Recording:

      IMG_2037

      IMG_2037


      Share the Love

      • More
      • Share on Tumblr
      • Pocket
      • Click to share on Telegram (Opens in new window) Telegram
      • Click to share on WhatsApp (Opens in new window) WhatsApp
      Like Loading...
      Posted in Meditations, Uncategorized | 33 Comments | Tagged energy, equanimity, inspiration, life, meditation, mindful, peaceful, Yoga
    • Where Does Love Flow?

      Posted at 2:15 pm by Lisa K, on April 11, 2017

      Look into my eyes, look far and wide and deep.
      You see a long horizon line with an ever growing reach.
      Searching up you see a sky of love so radiant and bright,
      Peering down, a warmth and grace so soft,
      With beaming effulgent light.

      Viewing across the line,
      to the very farthest east,
      a rising calm of fond compassion,
      there’s no fear in you to say the least.

      Upon the west your eyes will dwell,
      your being feels enraptured,
      With gorgeous faith and exquisite love,
      Your senses are absolutely captured.

      Like lightening strikes you see clearly now,
      It’s your own eyes in the mirror,
      With astonishment and disbelief,
      You see that love flows so much nearer.

      Searching up and down,
      Side to side your gaze will leap,
      You realize that without a doubt,
      This gift in YOU is yours to keep.

      By~ Lisa K

      Share the Love

      • More
      • Share on Tumblr
      • Pocket
      • Click to share on Telegram (Opens in new window) Telegram
      • Click to share on WhatsApp (Opens in new window) WhatsApp
      Like Loading...
      Posted in Poetry | 14 Comments | Tagged beauty, happy, inspiration, life, love, poem, Poetry, Yoga
    Newer posts →
    • Recent Posts

      • It’s Not You, It’s Your Nervous System
      • The Quiet Power of Kindness
      • Living in the Moment – Entry Two
      • Living in the Moment
      • Reflections on 2024
    • Categories

      • Uncategorized (66)
        • Mini Yogis (2)
      • Poetry (30)
        • Creative Writing (6)
      • Life & Yoga (13)
      • Yoga Sequences (5)
      • Meditations (3)
      • Event Reviews (2)
      • Living in the Moment Series (2)
      • Recipes (1)

Blog at WordPress.com.

  • Subscribe Subscribed
    • My So-Called Yoga Life
    • Join 266 other subscribers
    • Already have a WordPress.com account? Log in now.
    • My So-Called Yoga Life
    • Subscribe Subscribed
    • Sign up
    • Log in
    • Report this content
    • View site in Reader
    • Manage subscriptions
    • Collapse this bar
 

Loading Comments...
 

    %d