My So-Called Yoga Life

The best and most beautiful things in the world cannot be seen or even touched- they must be felt with the heart. ~ Helen Keller
My So-Called Yoga Life
  • Home
  • About
  • Contact
  • Category: Yoga Sequences

    • The Yoga of Trees: A creative writing piece inspired by the word “tree”

      Posted at 5:34 pm by Lisa K, on February 17, 2018

      I thought I would do something a little different as far as writing goes to try and tap more into my creativity. In doing so I thought I would follow the idea of writing based solely on the inspiration of a word. I have seen blogging groups leave threads open like this and the intention is to help stir this creativity. When I started to think about what word to use, I thought I’d open a dictionary and find one randomly but then suddenly the word tree came into my mind and I went with it…

      Tree

      Leaves fall off randomly as the wind whips the tree’s branches this way and that. The branches give way with ease, flexibly moving with each gust. With each thrash, seeds fly off and if they are lucky enough to land on the forest floor in a spot where rays of the sunlight shine down to, they will likely germinate and grow. It is purely by chance that they are lucky enough to come into existence and once that miracle occurs, and they manage not to be trampled by animals or eaten, they will be around for a long time. They live for centuries and see many events come to pass. Passively listening and moving slowly as they grow towards the light of the sun. Their rings demonstrate the obstacles they must overcome in times of drought or cold. They wear these as insignificantly as the rings that show their strongest and most plentiful years of growth. Like an iceberg, that which we can see above in all its glory is only but a mere glimpse of the immensity and complexity of what lies below. In silence, they quietly breath in the carbon dioxide from the air and in return provide life giving oxygen for the inhabitants of the earth. They are the custodians of our existence, the artists who paint the beautiful blue hues in our atmosphere and are literally responsible for each and every breath that we take.

      The trees are akin to our inner seer, our divinity or force of life. We are born with all of the wisdom required to exist in this form, but are without faculties to grasp it and revel in its blissful glory. Our light is forever an observer, waiting for us to realize and bring to fruition the lessons we have to learn within our lives from our biological existence to our transcendental essence itself. The beauty and grace of our inner light is only revealed in tiny drops and when we least expect it. It is those times when we feel the sudden burst of attuned perfection of alignment in our body mind and soul and they vanish as uncontrollably as they may appear. We unknowingly tap into that sacred part of ourselves at times when we are working within our dharma or true purpose in this world. This is what may drive some to become more trained in the learning of how to witness and in essence become yoga.  This is the enmeshed existence of life with an acute awareness of our own divinity, something that is to be experienced only by a tiny fraction of the devoted monks and practitioners of spiritual awakenings.

      Like the trees, we all wish to know our purpose and give of it freely without attachment. We are jaded by this attachment which is what leads us to lose touch with our effulgent light, to be drawn into the dark. To feel anger, fear, scorn, hatred and jealousy and that is what draws out the evil that will inevitably hold us back forever.

      By~ Lisa Michelle♥️

      Share the Love

      • More
      • Share on Tumblr
      • Pocket
      • Click to share on Telegram (Opens in new window) Telegram
      • Click to share on WhatsApp (Opens in new window) WhatsApp
      Like Loading...
      Posted in Meditations, Poetry, Uncategorized, Yoga Sequences | 9 Comments | Tagged creative, Creativewriting, creativity, Dharma, expression, inspiration, life, Trees, Yoga, yogalife
    • Yoga For Tight Hips & Low Back

      Posted at 11:15 pm by Lisa K, on February 4, 2018

      In response to some friends who have asked me about yoga they can try at home for low back and tight hips, I thought it would be helpful to write a post so that others experiencing these concerns may try some poses to help improve range of motion and possibly alleviate some tightness causing some ongoing low back tension. I strongly urge you to visit a medical doctor before going ahead with any physical activities, including this sequence, to be sure that it is right for you and your body. Yoga can be very helpful, but is best practiced under the approval of your doctor if you have injuries or body health concerns.
      This sequence of poses can be completed after a gym workout, swim or other activity which has allowed you to warm up your body. They are gentle enough to practice on their own as well and you will want to go slow and feel how your body responds to the movements. That means that it is okay to breathe through tension, but not pain. If you experience pain, you should back off. For the sequence, I recommend having 2 pillows and 2 blankets- 1 thick and 1 thinner.   If you have a yoga block and mat, these will come in handy but the blanket can work in their place if you do not. Be sure to wear loose fitting, comfortable clothing so that you are not restricted in your movements. Breathe deeply and have fun!

      Cat & Cow

      IMG_9422

      I like to begin a sequence doing these stretches because they help you ground, become aware of your breathing and warm up the spine nicely.
      Come to table top position which is on all fours with the hands shoulder width apart and hands directly under the shoulders. The knees are hip width apart and knees should rest directly under the hips. Pressing down into your hands, take a breath in as you allow your spine to collapse down as your belly comes down towards the floor and you turn your gaze to look up.  On your exhale- begin to round the spine slowly by pulling the belly in and pressing down through your hands so you can press the upper back away towards the ceiling. Do the full inhale and exhale with poses for a total of 8 reps. Try to breathe deeply and slowly while keeping the inhales and exhales of equal length. Once completed, relax in table.

      Downward Dog

      IMG_9423

      Still in table, begin to press your hips up and back, lifting your knees up off of the floor. The knees can stay bent or the legs may be straightened. Fan the fingers of your hands and distribute the weight evenly. Try to bring your heels down towards the floor, it is not important if they come all the way down. Hold this pose for 10 long deep breaths.

      Child’s Pose

      IMG_9429

      Come down into child’s pose by bringing the knees down and the hips back towards the heels. Walk the hands forward on the floor and bring your forehead towards the floor. There are two versions, you can do one or both versions as they will relax the hips into slightly different positions. The first is with the knees wide and the second is with the knees together. Stay in the pose and breath deeply for 10 breaths. Come back into downward dog to prepare for the next pose.

      Lunge and Lizard Pose

      IMG_9424

      While in your downward dog, step the right foot forward, if your foot does not come in between your hands when you step forward, wiggle it forward as you bring your left knee down to the floor. Your front knee should be directly above your ankle and you want to bring your back knee back further as you feel the lengthening in your left hip flexors. If you want to, try straightening the back leg while keeping the hips low. If you are able to, bring your hands to your right thigh and hold here for 10 deep breaths.

      Next you will bring both hands down to the floor on the inside of your right foot. This will create an even deeper lengthening in the hips. If you wish, try lifting the knee of your back leg off the floor and straightening the leg. This is not necessary but you can give it a try! Breathe 10 long deep breaths here.
      To deepen this pose, begin to bend at the elbows, lowering your body down. Stop and breathe when you feel you are as far as you can go with a feeling of stretching, it should not be too intense. If you can go to this level and wish to try a bit more, try to lower the elbows down to the floor. Again, breathe deep and go where it feels best for you today. The modifications are given as options so that as your mobility increases, you will have another edge to work towards.
      Once you have reached the depth of your pose, stay for another 10 deep slow breaths before coming out and returning to downward dog. Repeat the entire posture from lunge into lizard on the other side with the left foot forward. Once complete, come back into downward dog.

      Warrior 2- Dynamic Movement

      IMG_3886

      IMG_3886

      Step your right foot forward in between your hands again, the the left leg so that you can lift your hands off the floor and come into standing. Your feet should be about 4ft. apart and then turn your body to the side of your mat. Feet should be a heel to arch alignment. This means that the heel of your front foot should line up with the inside of your back foot which will be turned in the same direction as your body. Begin to bend through the front knee and look at the foot as you do this to be sure you can see your big toe. This will allow the knee to be over the ankle properly. Hips are facing the side of your mat. Pull the low belly in and the chest up. Bring your arms out to the sides with palms facing down. Look over at the hand on the same side as your front, bent knee. Hold here for 5 breaths. Then do a dynamic movement of straightening and bending down into the pose, inhaling up and exhaling down 5 times. Straighten the front leg and step back up to the top of your mat. Prepare to do this posture on the other side with the right leg stepping back.

      Malasana

      IMG_9426

      When you have finished your warrior 2 on the left leg. Come to standing and if you are using a yoga mat, you may roll it up half way or roll up a blanket. This will be used to place under your heels in malasana. This is s deep squat pose and we will start first by allowing the feet to come slightly wider than hip width. Begin to bend at the knees, keeping the knees over the ankles, so sending the seat back, as though you are going to sit down into a chair. Bring the arms out in front of you as you squat to counter balance and also pull the low belly in. You may also bring the elbows to the thighs if you wish to stay here as your pose.  Or you may slowly squat down lower and lower until you bring your calves and back of the thighs as close together as comfortable. You may come down lower as you feel your hips lengthen over time. You may or may not need the mat under your heels but this is an excellent place to start. Once you come down into a full squat, bring your elbows to the inside of your thighs and hands into prayer position. Wherever you find the deepest version of this pose for you, take 10 deep and long breaths here. Slowly come up and give your legs a little shake out when you are all done.

      Baddha Konasana

      IMG_9427

      You may use props for this pose, I have demonstrated a few options you can try to see which feels best. The first is to sit on a yoga block on its lowest level. The sit bones should be firmly on the block, bring your feet together in front of you. A thick blanket may also be folded up and used in place of the block too.  If your knees come high off the floor, placing a pillow or bolster under each side will take the pressure off. Sit tall here and breathe into the pose for 15 breaths.
      The next modification is when you need some height to allow the pelvis to sit upright but not quite as high as a block. Folding a thinner blanket and allowing the sit bones to rest on it may be right for you. Placing pillows or allowing the knees to gently fall to the sides as you bring your feet together in front of you will depend on your level of comfort. Try to bring the heels as close to the body as possible in this pose.
      Finally, you may sit on the floor alone and bring the feet together as close to the body as possible. Sit tall, pull the low belly in and breathe deep. Whichever version you feel best doing, hold for the 15 long deep breaths. When you are done, come down to lay on your back.

      Wind Relieving Pose

      IMG_3887

      IMG_3887

      Check out the video to see how to do this pose. Begin by bending the knees and bringing the feet flat onto the floor. Cross the right ankle over the left knee, keeping the foot flexed. Take the hands behind the left thigh as you lift the foot off the floor. You will begin to feel the stretch in the right hip as you do this. Let the right knee gently fall out to the side as you hug the left leg in further until you feel a good stretch.  On the second side I demonstrate bringing the hands around the shin to take the pose a bit deeper, which you are welcome to try.  Hold for 10 deep and slow breaths. Come down and let the legs both come back into the floor. Do this pose on the other side, left leg coming over the right.

      Supine Twists

      IMG_3888

      IMG_3888

      Laying on your back, take the left leg and squeeze it in towards your chest. Then take the right hand to the outside of the left thigh and bring the knee down towards the floor on the left. As your body twists, try to keep the left shoulder down to the floor. The left hand rests out on the floor away from the body. Hold here for 10 breaths. Let the leg come down and do your other side.

      Happy Baby Pose

      IMG_9428

      Laying on your back bring your feet to your hands allowing the knees to bend beside your body. You can take the inside or outside of the feet. Gently pull the feet down as your knees come towards the floor. Some find it nice to rock back and forth gently on the sacrum- this is the bone in the low back you will feel pressing down into the floor in this pose. Take 10 deep breaths here.

      Legs Up The Wall

      IMG_9441

      As a nice resting pose that still brings more comfort to the low back, bring your seat right up against the wall and allow your legs to extend up the wall. Your upper body should be relaxed and the arms gently beside you. You may close your eyes and rest here taking as many breaths as you wish to relax after your sequence of poses. If you find it comfortable to come back down laying on the floor in savasana where your arms and legs are just softly extended down beside the body, feel free to rest here for a while afterwards too.

      I hope you found these poses helpful and they really do get more comfortable as you practice them more regularly. Try doing these 2-3 times a week and work your way up to as many as you can fit in. Even doing these poses before bedtime is relaxing and helps your body unwind and prepare for rest. If you have any questions or concerns, please leave a comment below with your comment or email and I can follow up with you. As always,have a beautiful week!

      Much Love,

      Lisa xo

      Obligatory Disclaimer- Please note that no part of this of practice is intended to be used to diagnose, treat, or prevent any conditions. It is not meant to replace consultation with a medical professional. This information is for educational purposes and the practice is completed at your own risk. If you have any health conditions, please contact your medical doctor before engaging in this practice.

      Share the Love

      • More
      • Share on Tumblr
      • Pocket
      • Click to share on Telegram (Opens in new window) Telegram
      • Click to share on WhatsApp (Opens in new window) WhatsApp
      Like Loading...
      Posted in Uncategorized, Yoga Sequences | 32 Comments | Tagged health, healthybody, lifestyle, motivation, Yoga, yogaforlowback, Yogafortighthips, yogapractice, yogasequence
    • Easy Beginner Yoga Practice

      Posted at 1:18 pm by Lisa K, on October 29, 2017

      Recently my friend Kasia asked me to share a yoga practice with her readers on her blog The Savvy Dreamer   I have been following her healthy lifestyle blog for a while now because she shares such delicious recipes, interesting travel stories, helpful fashion and beauty tips.  Since I really enjoy teaching yoga and sharing practice sequences, I was very enthusiastic about sharing a beginner practice with her readers.

      Design

      Many people have asked me about a practice that would be best suited to someone who is just starting out and would like to enjoy the many benefits of doing yoga. I have created a sequence that I think helps to strengthen and bring increased mobility to the entire body AND it can be done in less than an hour. If you are looking to improve flexibility, begin a weight loss regimen, improve mobility or de-stress, this is a great sequence for you! To learn the full sequence please visit Kasia’s Blog

      I would love to hear of any poses that have helped you. Please feel free to comment below and tell me if there are any other areas you would like a focused practice on. Tight Hips? Maybe poses best for sleep? I’d love to hear!

      Have a wonderful week😄

      Lisa Michelle xo

      Share the Love

      • More
      • Share on Tumblr
      • Pocket
      • Click to share on Telegram (Opens in new window) Telegram
      • Click to share on WhatsApp (Opens in new window) WhatsApp
      Like Loading...
      Posted in Uncategorized, Yoga Sequences | 27 Comments | Tagged beginneryoga, behealthy, easyyoga, getfit, healthybody, lifestyle, motivation, newtoyoga, startyoga, Yoga
    • Yoga & Essential Oils

      Posted at 3:35 pm by Lisa K, on August 6, 2017

      Think about what yoga does for the body and mind…It brings calmness and clarity to start. It sharpens our body awareness and mental focus. It helps us develop introspection and opens the door for learning so much more about ourselves. I want to share with you a yoga practice incorporating use of the healing and balancing properties of essential oils! My two favorite things coming together to create the ultimate experience of physical and mental rejuvenation!

      Essential oils have long been known to contain properties that are able to assist in emotional balance. There are hundreds of components that make up these all natural oils which are steam distilled or pressed from pure plants. Inhaling them will allow the molecules to reach the brain in 22 seconds, and all body cells within 20 minutes. The constituents within them carry different electromagnetic frequencies which may compliment our body composition to facilitate equilibrium.

      Yoga is used similarly to bring calming feelings to the body and mind through poses and deep breathing. When we bring these two elevating elements together it is such a beautiful experience.

      Opening the Heart- Chakra Basics

      The practice I wish to share with you today will focus on balancing one of the Chakras or energy centers in the body. There are thought to be 7 majour energy centers along the spinal meridian of the body and we are going to work with the 4th- Anahata (meaning unstruck or unhurt) or the heart chakra. It’s colour is green and it is believed that when the heart chakra is balanced, it allows for us to experience love with others, self-love, compassion, generosity, warmth and joy. Others feel our love and warmth and we are able to know when to take time to care for ourselves as well. Unifying love connects us all and so opening the heart chakra to balance is a wonderful way to enhance well-being. It may then be possible to connect to the deepest parts of our being, our spirit and our true essence. Doesn’t this sound absolutely marvelous?

      Sensational Oil Selections

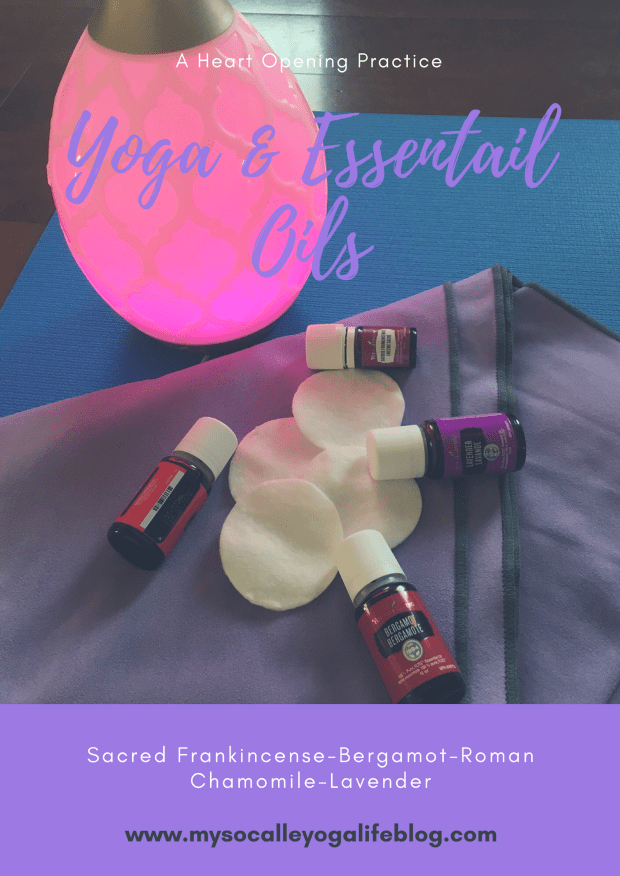
      The oils I have selected to accompany this yoga sequence may bring about such complimentary feelings that I feel the practice is simply divine!

      Sacred Frankincense

      This essential oil comes from Oman, which is a country on the Arabian Peninsula. The species of frankincense tree which produces this resin and essential oil is only available here through Young Living. It is slightly sweeter in its aroma than others and I find it to be very grounding.  It helps me feel more focused when doing my meditations and yoga practice. It is the oil I have in my diffuser, you will see it in my pictures!! It is a fabulous diffuser too! Brand new 8 hr. diffuser called he Dessert Mist by Young Living.

      Bergamot

      I use this oil almost daily. It is cold-pressed from the bergamot orange peel and has a light, citrusy aroma with a warmth that almost seems slightly floral. It is thought to work on a frequency that may help to balance the heart chakra specifically. When I inhale this oil, I always smile. It is also very relaxing yet uplifting and I use it frequently to de-stress. It is a fitting compliment for the intention of this yoga sequence.

      Roman Chamomile

      This oil was the first I ever used in a diffuser. I was going through some super stressful stuff and the effect of this oil was so immediate for me that it made the hairs on the back of my neck stand up, I was so surprised. It is steam distilled from the Chamomile flower and has been widely used for emotional balancing for many years. Because of its power to balance emotions, it is a fitting oil for today!

      Lavender

      Lavender, how do I love thee? I first used Lavender to rub in my palms and give neck massages in my yoga classes because that is how it was introduced to me, it was so wonderful. I absolutely love it and NEED to share it with others. Good for so many things, lavender is calming, acting as a nervine as well- which calms the nervous system as well as the mind.

      I really hope you enjoy this sequence and feel open and happy when you are finished. The practice will still be so good for you, even if you don’t have any oils! Loose fitting clothing and a mat are all you need for this one. If you don’t have a mat, it can work without one. Mats are a relatively new accessory as far as the history of yoga is concerned, so it’s a nice to have but not a must;)


      Heart Opening Yoga Sequence & Essential Oils

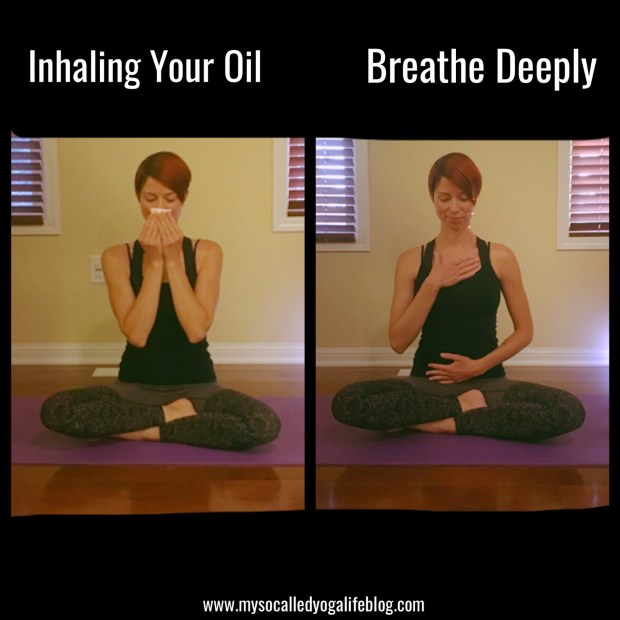
      Take a cotton pad or a small face cloth and put 2 drops of your essential oil into the centre of it. For each of the four oils we are using, use a separate cotton pad and prepare them in advance. I usually put the bottle of the oil that I placed on the pad next to each one, so I know which is which. These are close to my mat so when I am ready, I can easily reach for them.

      Begin by bringing the pad with Bergamot close to your nose and take a few deep breaths in.

      Once you have done so, put the pad down and cross your legs on your mat, placing one hand over your heart and the other over your abdomen. Take 5 deep breaths, with your eyes closed if you wish. Feel the air opening your belly and chest as you breathe.
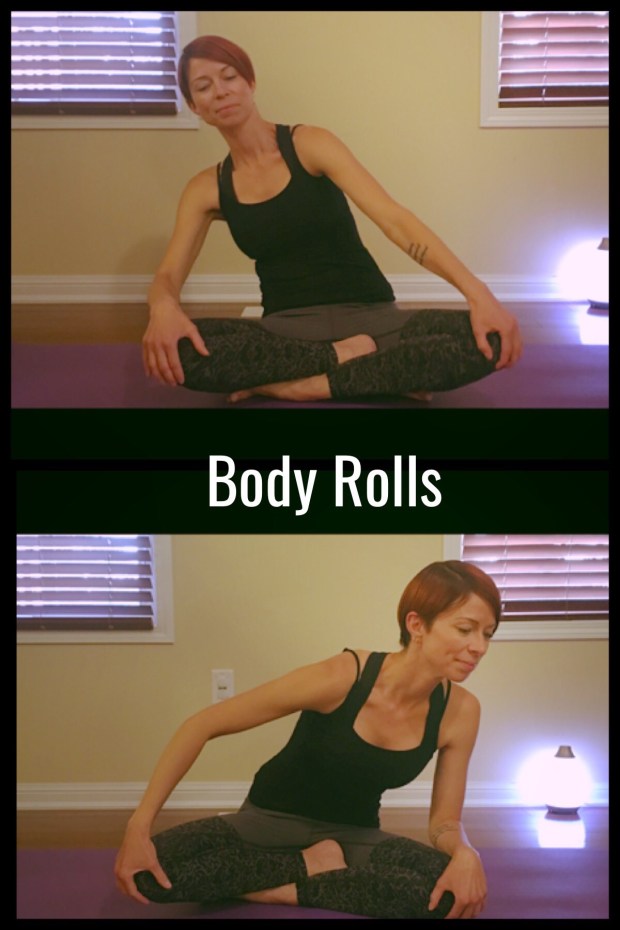
      IMG_2249

      Body Rolls

      Bring your hands to your knees and roll at the hips to bring your whole body in a circle. Taking deep breaths, do 5 to the right and then 5 to the left.

      IMG_2251

      ~~Take a few moments to inhale the Bergamot oil pad again~~

      Seated Stretches

      Bring your arms behind you, interlace your fingers, pull your chest up and your arms down and back. Gaze up and take 5 deep breaths. Let your hands come to the floor at your sides. Bring your right hand up, arm next to your ear, stretch up and over to the left. Let your left arm move away from you as you bend and keep both seat bones pressing down into the floor. Take 5 deep breaths and then repeat this stretch with the other arm.

      Now take your right hand across to your left knee, and your left hand behind your back as close to your spine as is comfortable. Inhale and bring your chest up, exhale turn to look over your left shoulder. Hold here for 5 deep breaths. Repeat on the other side- left hand comes across to the right knee, right hand comes behind your back as close to the spine as possible. Inhale, chest up, exhale to twist and look over your right shoulder.
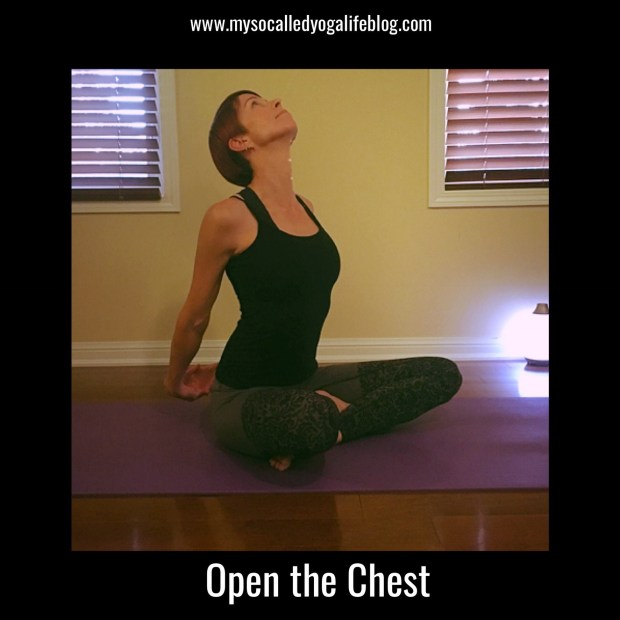
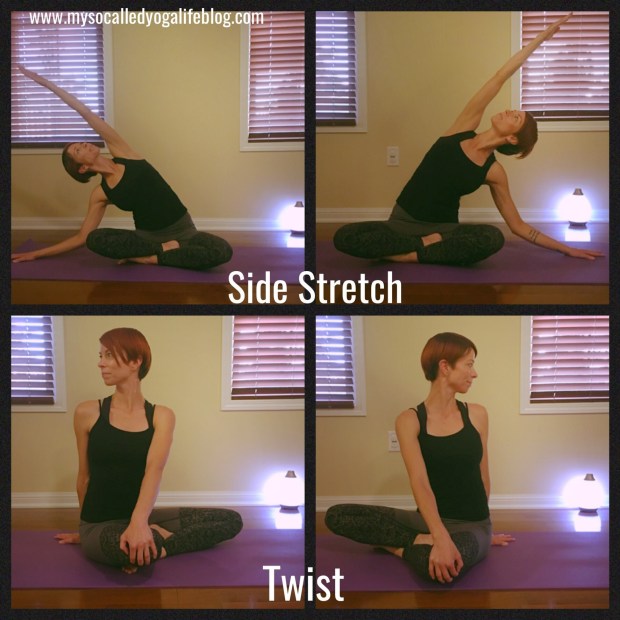
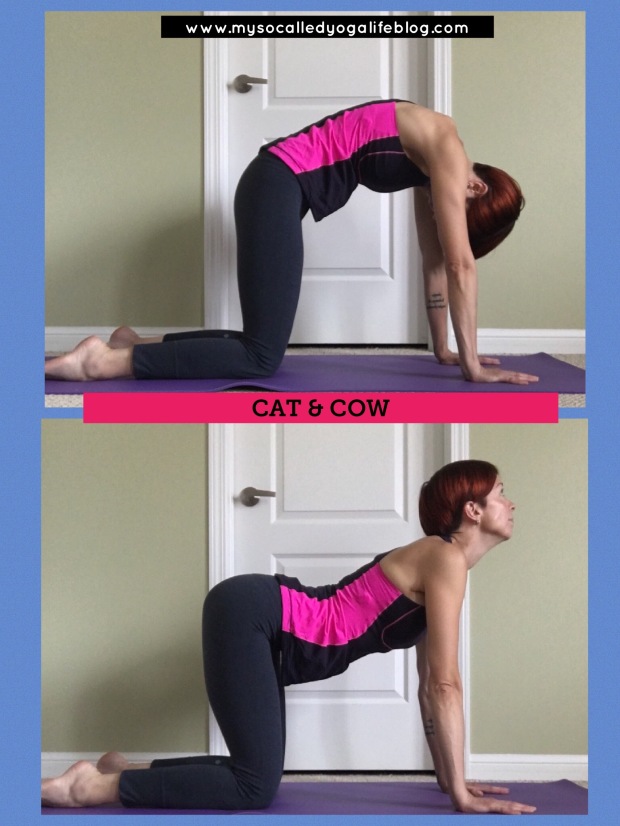
      IMG_2250

      IMG_2248

      Table Pose Work

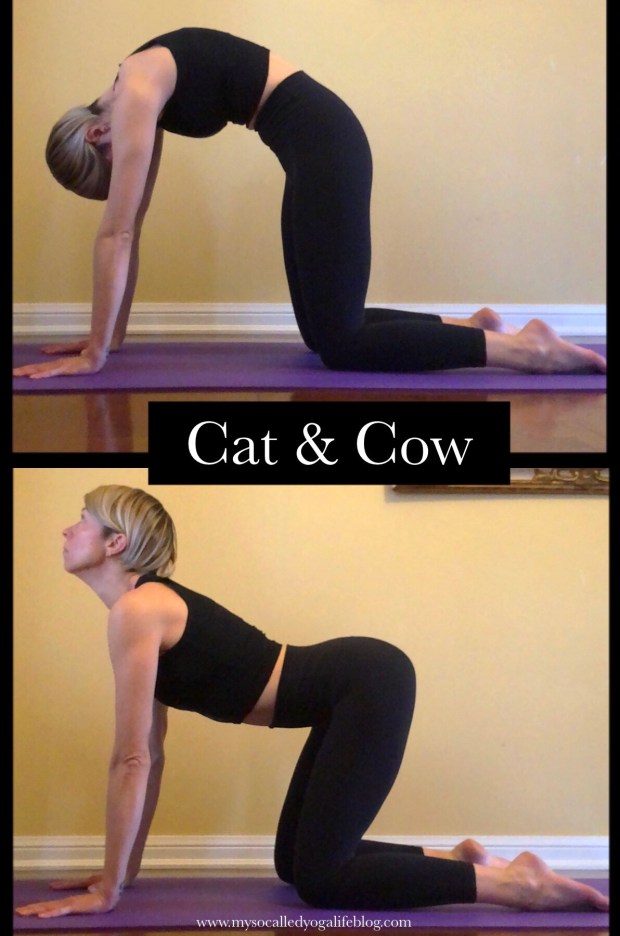
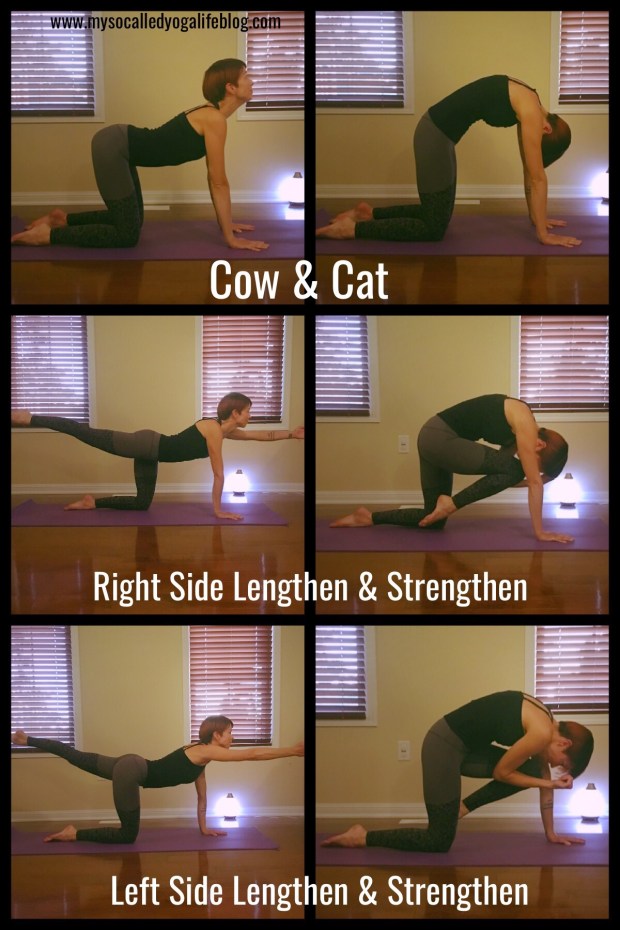
      Come to table pose- knees are hip width and stacked under the hips. Arms are shoulder width and shoulders are over your hands. Begin to inhale and drop your middle section down, looking up and pulling your chest up, now exhale and move into cat by pulling your back up towards the ceiling and pressing down into your hands and knees. Repeat this, you guessed it- 5 times.

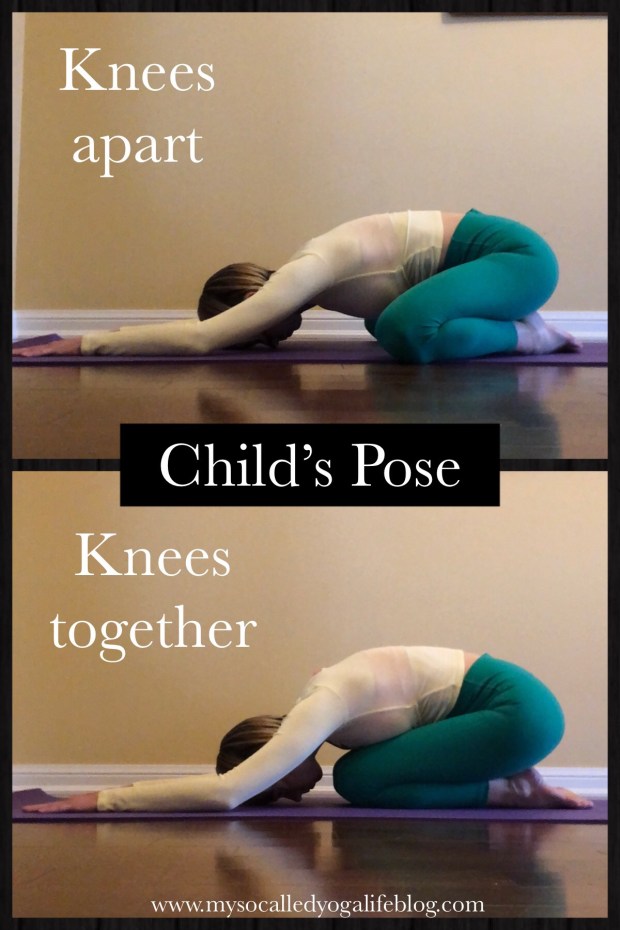
      Come back to a neutral spine and lift your right leg back behind you, keeping your weight even. See if you can extend your left arm. Hold for a few breaths and then inhale as you lengthen your lifted limbs away from you and then exhale bring elbow to knee as you curl your back. Do this 5 times. Repeat on the other side. Then come into child’s pose. Hold for a few breaths.

      IMG_2252

      ~~Come up and take a few moments to inhale your chamomile cotton pad~~

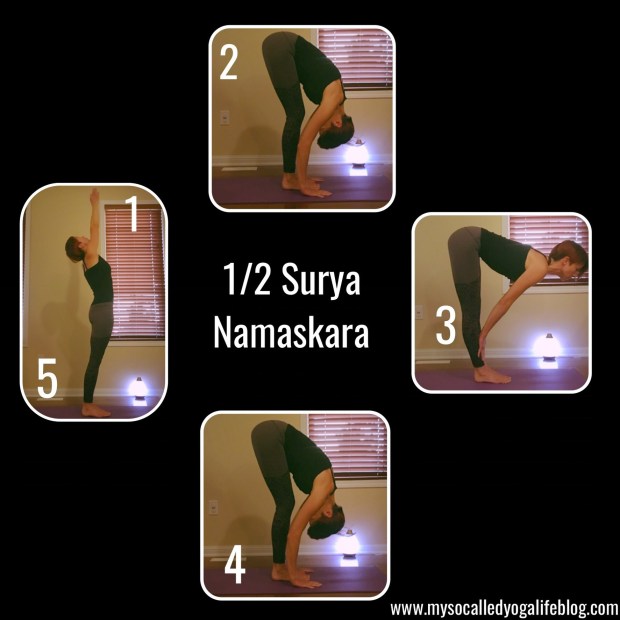
      Sun Salutations-1/2 Surya Namaskara

      Start in standing and then reach your arms up, palms to touch as you inhale. Exhale as you swan dive forward, bringing your ands towards the ground (bend knees slightly or more if that’s comfortable). Inhale coming to a flat back, hands to shins, exhale down again and then inhale all the way up to standing. Repeat 2 more of these 1/2 sun salutations.

      IMG_2261

      Full Surya Namaskara

      Inhale, reach arms up and bring your palms to touch.

      Exhale as you swan dive forward, bringing your hands towards the ground (bending knees as needed).

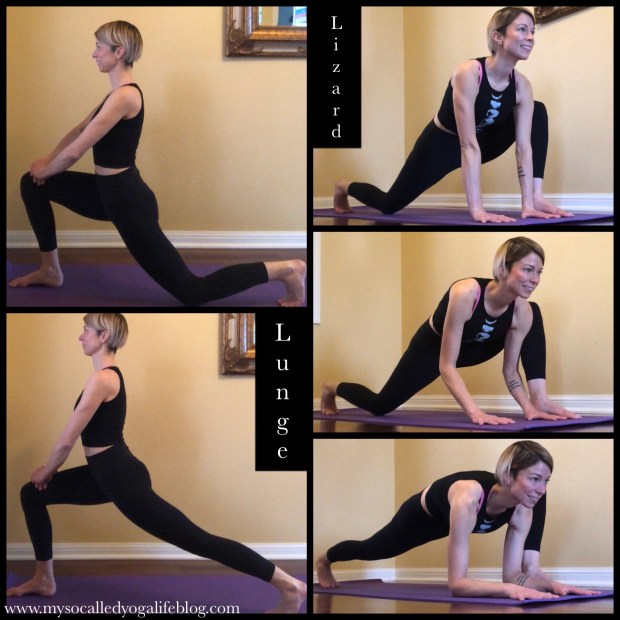
      Inhale and step the right foot back into a lunge, bringing hands to the ground on either side of your left foot.

      Exhale step left foot back coming through downward dog and down into 8-limbed pose- bending the elbows beside your body, bring the knees, chin and chest to the floor while keeping the hips up.

      Inhale sliding through into cobra pose- hips and legs strong and on the floor while chest is coming up and through, arms may be bent at the elbow.

      Exhale coming into downward dog by pressing into the knees and hands.

      Inhale, step the right foot between the hands and coming into a lunge.

      Exhale, stepping the left foot forward to meet the right in a fold. Inhale raising the arms up and coming back to standing.

      Do another surya namaskara but in place of the low lunge for each side, bring the arms up towards the ceiling.

      Do a third and final one but at the lunge, bring the arms into eagle arms. This is done by bringing both arms out in front of you, bringing left arm under the right, bend the elbows and turn your palms towards you. Bring the right hand behind and around the left and see if you can bring the palms towards each other. Bring the elbows up and then unwrap and come back low lunge to do the next transition. Wrap the arms the opposite way for the other side. When you have completed the 3 rounds, stand and take some recovering breaths.

      IMG_2260


      ~~Take a few minutes to inhale your chamomile again~~
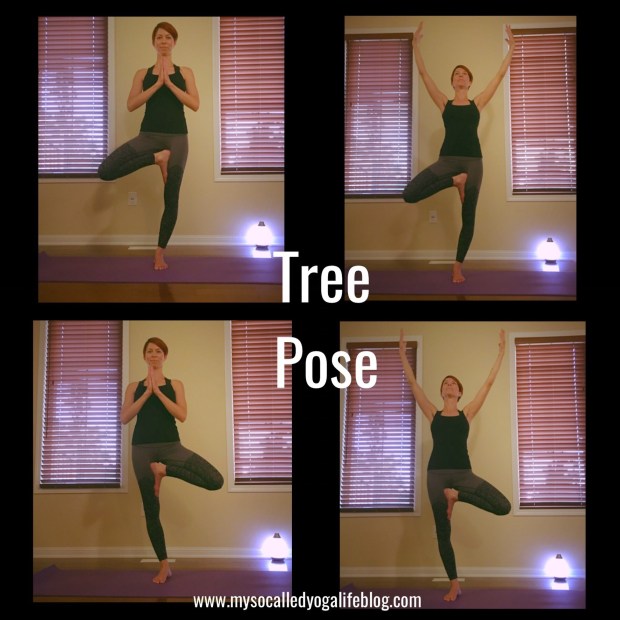
      Tree Pose

      Bring your weight into your left foot. Turn your right foot out and bring the sole to the inside of your left foot, keeping the ball of the foot on the floor. Raise this leg up where it is comfortable to balance- either below or above the knee. Keep the hip level, press the foot into your left leg. Hands may be in prayer or you can bring hands up towards ceiling and look up, feeling your chest come up. Stay here for 5 deep long breaths and then come down and prepare the other side. Do the other side the same way.
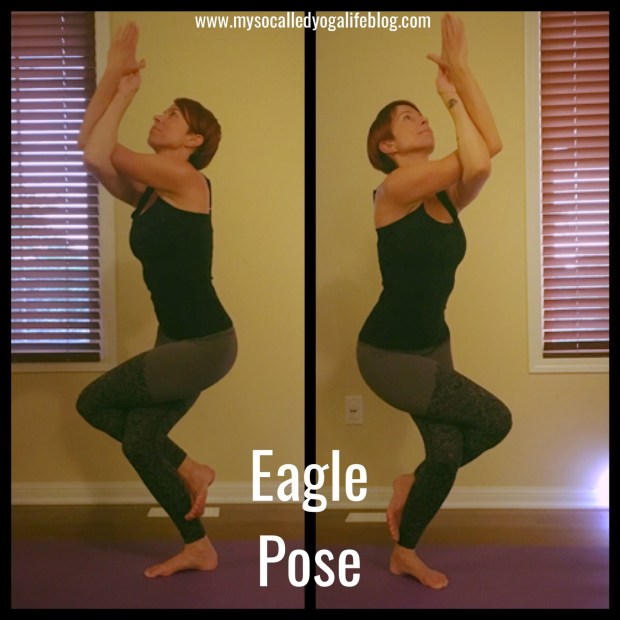
      IMG_2253

      Eagle Pose

      This pose begins by crossing the right leg over the left, once or wrapping it around again if possible. Bending in your standing left leg. Eagle arms again for this side the right arms starts under the left. Once in the pose, find a staring place to help you balance, draw the elbows and chest up. Hold for 5 deep breaths. If you fall out, come back in again and try. Repeat on the other side. Left leg over right standing leg, left arm under right for the arms.

      IMG_2256

      Wide Leg Fold & Garland Pose

      From the top of your mat, step the left foot back around 4-5 feet, turn both feet to the long side of the mat. Inhale your arms out to the side, exhale and interlace your fingers behind your back. Inhale here and then exhale folding at the hips letting the hands come down towards the floor. Hold for 5 breaths here and then come back up.

      Bring your feet closer together, slightly wider than hip width. Bend your knees and come into a deep squat. Your feet may turn your feet out slightly and the heels may not come all the way down to the floor. It’s okay. Bring hands into prayer and elbows to the inside of the thighs, pressing out gently and pulling the chest up. Hold here for 5 breaths.

      IMG_2258   IMG_2254

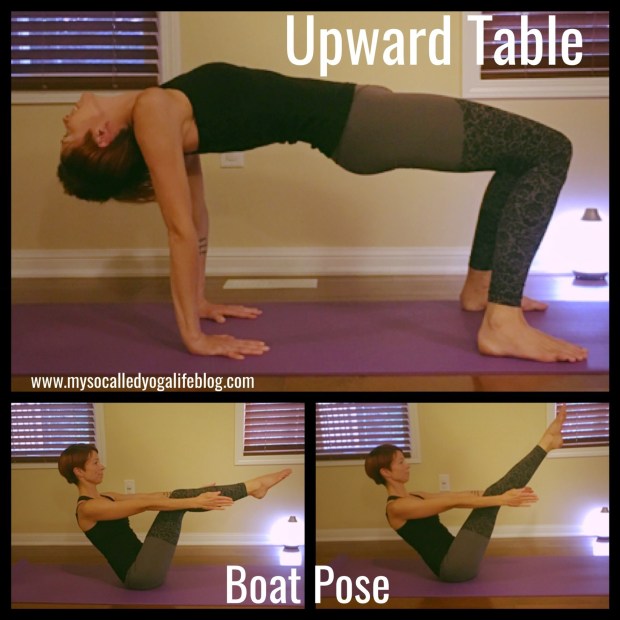
      Upward Table & Boat Pose

      Come to sit down towards the top of your mat. Bring the feet parallel and to the width of your hips, and hands with fingers facing your feet, about 1 foot back behind you. Press into your feet and hands, raise your hips up. If it is comfortable, let your head fall back. Keep pressing the inner legs towards each other as they will naturally try to open as you raise your hips. Hold for 5 breaths. Come down slowly.

      Prepare for boat pose by letting your feet stay flat on the floor, bring your hands behind your thighs and lean back, using your abdominals. Raise your feet off the floor and bring your shins parallel to the floor. If you can, let your thighs go and bring your hands straight towards your feet on either side of your body. You may hold here for 5 breaths or extend the legs out and up so you look like a V and hold here. When you have completed this sit calmly.

      IMG_2257

      ~~Take a few minutes to inhale your Bergamot cotton pad~~

      Locust Pose, Sphinx Pose & Cobra

      Come to lay on your tummy. Bring strength into your legs, pressing the tops of the feet down into the floor. Bring your hands beside your body, palms up. Raise your torso up, gazing slightly forward past your mat. Hold for 5 deep breaths and then gently come down.

      Bring your hands on the floor, palms down on either side of your head. Bring strength into the legs, press into your forearms and pull your chest up. Gaze up. Hold here in sphinx pose for 5 breaths and then slowly come down.

      Slide your hands back in line with your lower ribcage. Strengthen the legs, press the tops of the feet down, pull the low belly in. Press into your hands and pull your chest forward as you peel your torso off the floor. Keep the elbows tight to the body and the neck long. Hips and legs stay on the floor. Hold here for 5 breaths and then co e down slowly. Take a child’s pose.
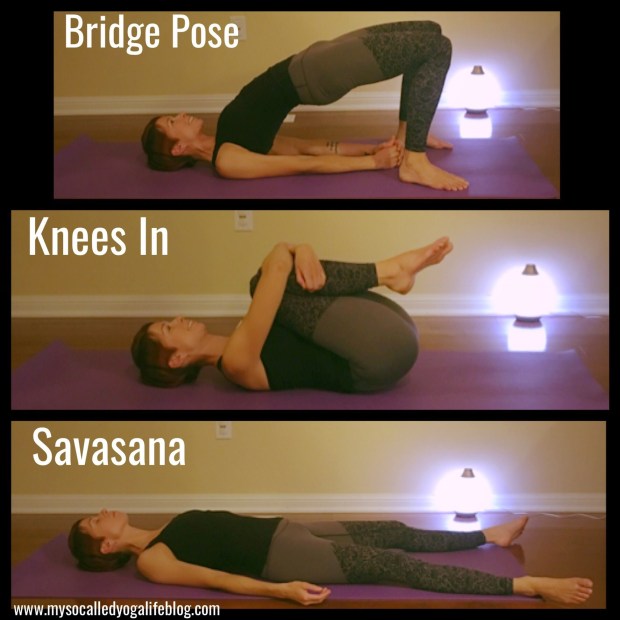
      IMG_2255

      Bridge Pose

      Come onto your back, feet flat on the floor. Bring your hands down to grab your ankles. This will ensure your legs are in the correct position. Press into the feet, squeeze the legs slightly to keep them hip width as you raise your hips up. If you can interlace your fingers underneath your body, do this and lengthen the arms in the direction of your feet, keeping them on the floor. Hold for 5 breaths. Come down slowly and then reset for another round. When complete, bring your knees and hug them into your chest. You may gently roll side to side if this feels good. Hold for 5 breaths.

      ~~Take a moment to inhale your Lavender cotton pad~~

      Sometimes I even place it on my forehead at this time. It is rest time, savasana. Let your body relax, palms up, feet wider than hip width. Lay here for 5 minutes or as long as you wish.


      IMG_2259

      Come up, have some water. How do you feel? How does your body, mind and emotions feel? I hope you feel relaxed and happy💖

      If you wish to learn more about Young Living essential oils or have any questions, please email me here: lisa.krisman@gmail.com


      Obligatory Disclaimer- Please note that no part of this of practice is intended to be used to diagnose, treat, or prevent any conditions. It is not meant to replace consultation with a medical professional. This information is for educational purposes and the practice is completed at your own risk. If you have any health conditions, please contact your medical doctor before engaging in this practice.

      Share the Love

      • More
      • Share on Tumblr
      • Pocket
      • Click to share on Telegram (Opens in new window) Telegram
      • Click to share on WhatsApp (Opens in new window) WhatsApp
      Like Loading...
      Posted in Uncategorized, Yoga Sequences | 39 Comments | Tagged essential oils, feelgood, happy, inspiration, life, moodbalancing, Yoga, yogasequence, youngliving
    • Yoga For Tight Shoulders

      Posted at 3:07 am by Lisa K, on July 10, 2017

      This practice is done mostly while sitting with your legs crossed or on your heels if crossing your legs isn’t comfy.  No mat needed!

      I want to tell you a little story about my shoulders that you just might be able to relate to…

      When I was working as an educator years ago, my hours were around 16 hours a day. I traveled for 3 hours daily and was living life with a high stress factor. Luckily, I really loved what I was doing but I was paying the price for long hours by having very little personal time.  Though I was always active, there was just no time! So I thought I’d try something else that could be healthy- At the time detox cleanses were all the rage. I thought I would try one out since I could augment my diet and clean it up without interfering with my job. It Actually turned out to be really tough. I had to cut coffee, which left me with a three day headache, eww! After the haze lifted, I started to feel okay again. I was quite a different person though, LoL! So much more quiet and less bubbly were the first things I noticed about myself. Not bad things, just very different. I started to pay more attention to myself in other ways as well.

      I was walking around with my shoulders up ALL THE TIME.

      I sat at my computer and worked with them tensed up like this. I walked around the school this way, I took transit home, still tiring myself out by subconsciously holding my shoulders up. I had frequent headaches and felt tension in my shoulders, but thought it was from carrying my laptop bag around and general stress. Wow, once I noticed how this little habit had crept into my daily living, I was kind of shocked at how much I was doing it and above all, how completely OBLIVIOUS I was! I started reminding myself to relax my shoulders every time I noticed I was doing it.

      I think I reminded myself around 35 times a day the first week.

      Just imagine the times I didn’t notice! Anyways, I felt much better after doing this for just 2 weeks. After about 1 month, I had trained myself to function without the raised shoulders. The amount of stress and tension I had released with this simple change in my daily posture changed much about how my body felt in general. It’s amazing how expending energy and creating needless stress can affect the body, especially when you notice the change once it’s removed!

      Why am I telling you about this craziness?

      Well, for many of us, a computer or a desk is a daily reality. I thought it might be a good idea to share a little yoga sequence geared towards relaxing the shoulders and giving yourself a free therapeutic yoga session! I can’t be the only one who has created significant tension in this area of my body;)

      So when you finish up work for the day and want to gear down in a healthy and positive way, give this targeted and easy sequence a go!

      Put on some comfy clothes, NO MAT NECESSARY! Just a couple of fluffy pillows or if you have them- 2 yoga blocks.

      Yoga For Shoulder Tension

      Start in a seated position with your legs crossed. Sitting as tall as you can, take a few deep breaths to begin relaxing yourself. Close your eyes if this helps you to chill out. Then when you are ready, start with some shoulder rolls, go back into a circular motion slowly 5 times and then slowly forward 5 times.

      IMG_2126

      Head Rolls

      Roll out your neck by letting your chin fall toward your chest and then inhale as you circle to the right, exhaling as you come around again. You can let your head go back if it is comfortable or simply bring your head through a half circle, letting your neck remain up straight as you bring your head up from your starting side.  Do 5 slowly to the right with deep inhales and exhales and then repeat this process going to the left.

      IMG_2125

      Interlace Finger Stretch

      Now take your hands in front of you, interlace your fingers and turn your palms out. Send your arms up towards the sky. Hold here and take 5 deep breaths. Then open them and let them come down to the floor. Now take your arms behind you, interlace your fingers and tip your body forward, letting your arms come up. Hold for 5 breaths and then come back to sitting and let your hands come to your sides on the floor.

      IMG_2127

      Elbow Hold Stretch

      Bring your hands to opposite elbows behind you, bring your chin down towards your chest and hold for 10 breaths.  This stretch is a bit more passive and it feels very good with the internal rotation of the arms while letting everything relax into the stretch here.

      IMG_2136

      Side Body Stretch

      Take your right arm and lift it up, stretch up and over to the left, letting your left hand walk away from you as you lengthen to the side. Try to keep both seat bones on the ground.  Lift the chest, hold your low belly back.  Hold for 5 breaths, then come back to the middle and do the left arm up, stretching to the right.  After your 5 deep breaths, let your arms come down to rest on your knees.

      IMG_2128

      Easy Twist

      Bring your right hand behind your back, palm on the floor as close to your spine as possible.  Bring your left hand to your right knee.  Now take a deep breath in- as you exhale, twist and turn your head to look over your right shoulder.  Take 5 slow deep breaths here and then return to centre.  Repeat for other side, taking the left palm behind your back as close to your spine as possible.  Right hand to left knee this time.  After your deep inhale, twist as your exhale and look over your left shoulder.  After your 5 breaths, come back to centre.

      IMG_2130

      Eagle Arm Stretch

      Now take your hands in front of you, cross the right over the left and turn your palms towards you.  Now cross your wrists with the right one away from you and see if you can bring your palms towards each other.  They don’t have to be lined up.  Deep breath in and raise the elbows up until you feel the stretch and hold for 5 deep breaths. Then bring them down, letting your back curl up and your elbows come down towards your abdomen. Breath deep for 5 breaths here and then come up and shake your arms out!  Now try the other side with the left arm crossing over the right, palms turn towards you.  Cross your wrists with the left one behind and try to bring your palms towards each other.  Repeat lifting elbows up, then elbows down with a curled back and then come up and give your arms another shake!

      IMG_2133

      Cow Face Arms

      For this pose, you can take a pillow case or other bit of fabric to hold if your hands don’t reach each other in the pose.  This one is a real stretch, so give it a try with your prop first and then give the full on posture a go!  So grab your pillow case near the end with your right hand and raise your arm straight up next to your ear.  Now bend at the elbow only and bring your hand towards the base of your neck on your back.  Take your left arm now and have it down, internally rotated so you can reach for the pillow case which is hanging down your back.  Use your hand to walk up the case, bending at the elbow as far as you feel is comfortable.  Sit tall, keep your head up straight and breath deep for 5 breaths.  Now let go of the prop and shake out your arms.  Let’s do the other side! Take your pillow case near the end in your left hand, raising it up beside your ear.  Bend at the elbow and bring your hand towards the base of your neck on your back.  Take your right arm now, rotate the arm in so as you reach behind you for the pillow case, it is positioned correctly.  Walk your hand up the pillow case a small far as is comfortable and do your 5 breaths.  Shake those arms out!

      If you want to give it a try, do it without the prop.  When you walk your left hand up on the first side, you can press it into your back to move up and grab the fingers on your right hand.  Same fo the left side.  It is an intense stretch so be careful when attempting this version:)

      IMG_2132

      Cat & Cow Pose

      Come to table pose. Hips over knees and shoulders over hands.  Now inhale, as you exhale, round your back (into cat) and press your hands firmly into the ground.  As you inhale, let your tummy collapse down (into cow) and bring your head up.  Do this dynamic stretch 5 times while exhaling into cat and inhaling into cow.

      IMG_2131

      Puppy Pose

      Come down onto your elbows and bring palms down. Let your chest come towards the floor as you extend your arms away from you into puppy pose.  You will feel this stretch in your shoulders and under your armpits.  Hold for 10 breaths, passively breathe into this pose, walking your fingers away as far as is comfortable.  Let your head comfortably lay on the mat.

      IMG_2145

      Thread The Needle

      Come up to table pose again and this time bring your right arm behind your left hand and begin to lower your shoulder down to the mat.  Let your left arm extend forward and feel a nice stretch on your right shoulder.  Hold for 5 deep breaths and then come back up to table and let your left arm come behind your right hand, bringing that shoulder down onto the ground.  Same length in the right arm and hold for 5 breaths before coming back up.

      IMG_2129

      Shoulder Release with Prop

      You should be back into table top pose once your prop is in place.  If you have 2 blocks, set them up shoulder width apart on the long side down (on the lowest level) and place your elbows on them. Bring your palms together.  Let your head come down towards the floor. If you don’t have blocks, get a fluffy pillow or 2 and put your elbows on that. It will be a softer stretch, but maybe that’s just what you need! After 5 deep breaths, slowly come out of the pose and put your prop off to the side.  If you were using a pillow, bonus! You can put it under your head for the next pose:)

      IMG_2135

      Savasana

      Slowly lay down on your back with your palms up and feet resting outwards in savasana. Relax for 5 minutes or more as you wish.

      IMG_2134

      How do those shoulders feel now? I bet they feel loose and the tension you had is long gone! So easy! So quick!  And the way your body will feel if you do just this shoulder sequence a couple of times a week will make a big difference! Hope you had fun with me!

      NAMASTE😊

      Share the Love

      • More
      • Share on Tumblr
      • Pocket
      • Click to share on Telegram (Opens in new window) Telegram
      • Click to share on WhatsApp (Opens in new window) WhatsApp
      Like Loading...
      Posted in Uncategorized, Yoga Sequences | 41 Comments | Tagged ashtanga, beginneryoga, de-stress, easyyoga, inspiration, life, loveyourself, practice, release, selfcare, shoulders, tension, Yoga
    • Recent Posts

      • It’s Not You, It’s Your Nervous System
      • The Quiet Power of Kindness
      • Living in the Moment – Entry Two
      • Living in the Moment
      • Reflections on 2024
    • Categories

      • Uncategorized (66)
        • Mini Yogis (2)
      • Poetry (30)
        • Creative Writing (6)
      • Life & Yoga (13)
      • Yoga Sequences (5)
      • Meditations (3)
      • Event Reviews (2)
      • Living in the Moment Series (2)
      • Recipes (1)

Blog at WordPress.com.

  • Subscribe Subscribed
    • My So-Called Yoga Life
    • Join 266 other subscribers
    • Already have a WordPress.com account? Log in now.
    • My So-Called Yoga Life
    • Subscribe Subscribed
    • Sign up
    • Log in
    • Report this content
    • View site in Reader
    • Manage subscriptions
    • Collapse this bar
 

Loading Comments...
 

    %d